LangGraph gets interesting as soon as we start to integrate it with our tasks. For that we need custom tools so that the LLM can interact with our data. Let us see how we can create our own tools and use them in LangGraph.
The first tool
We can turn any Python function into a tool by adding the @tooldecorator:
importosfromtypingimportTypedDict,Literal,Annotatedfromlangchain_openaiimportChatOpenAIfromlangchain_core.toolsimporttoolfromlangchain_core.messagesimportBaseMessage,ToolMessagefromlanggraph.graphimportStateGraph,START,ENDfromlanggraph.graph.messageimportadd_messages# 1. Define the Tools@tooldefmultiply(a:int,b:int)->int:"""Multiply two integers together."""returna*btools=[multiply]# 2. Create the LLMllm=ChatOpenAI(base_url="http://localhost:1234/v1",api_key="lm-studio",model="openai/gpt-oss-20b",temperature=0.1)# 3. Bind tools to the model so it knows how to call themmodel=llm.bind_tools(tools)# 4. Define the StateclassState(TypedDict):# Annotated with add_messages so history is preserved in the loopmessages:Annotated[list[BaseMessage],add_messages]# 5. Define the Nodesdefagent_node(state:State):"""The LLM decides if it needs a tool or can answer directly."""print("--- AGENT: Reasoning ---")response=model.invoke(state["messages"])return{"messages":[response]}deftool_executor_node(state:State):"""Manually executes the tool call requested by the LLM."""print("--- TOOLS: Executing Tool ---")last_message=state["messages"][-1]tool_outputs=[]fortool_callinlast_message.tool_calls:# Map the tool name to the actual functioniftool_call["name"]=="multiply":result=multiply.invoke(tool_call["args"])# Create a ToolMessage to feed the result back to the LLMtool_outputs.append(ToolMessage(content=str(result),tool_call_id=tool_call["id"]))return{"messages":tool_outputs}# 6. Define the Looping Logicdefshould_continue(state:State)->Literal["continue","loop"]:"""Check if the LLM requested a tool or is finished."""last_message=state["messages"][-1]iflast_message.tool_calls:return"loop"return"continue"# 7. Build the Graphworkflow=StateGraph(State)# Add Nodesworkflow.add_node("agent",agent_node)workflow.add_node("tool_executor",tool_executor_node)# Define Edgesworkflow.add_edge(START,"agent")# Add the Looping Conditional Edgeworkflow.add_conditional_edges("agent",should_continue,{"continue":END,# No tool calls? We are done."loop":"tool_executor"# Tool calls found? Go to executor.})# After tool execution, always loop back to the agent to process the resultworkflow.add_edge("tool_executor","agent")# 8. Compile and Runapp=workflow.compile()# Print the visual structurepng_bytes=app.get_graph().draw_mermaid_png()withopen("tools.png","wb")asf:f.write(png_bytes)# Initial state with a math probleminitial_state={"messages":[("user","What is 144 multiplied by 2? And what is 4 multiplied by 5?")]}final_output=app.invoke(initial_state)print("\n--- FINAL RESULT ---")print(final_output["messages"][-1].content)
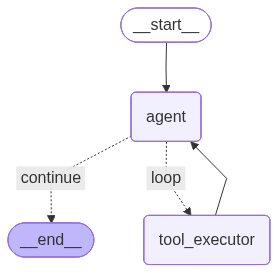
This gives us a graph that looks like this:
If we run it, we can get an output like this one:
--- AGENT: Reasoning ---
--- TOOLS: Executing Tool ---
--- AGENT: Reasoning ---
--- TOOLS: Executing Tool ---
--- AGENT: Reasoning ---

--- FINAL RESULT ---
144 multiplied by 2 is **288**.
4 multiplied by 5 is **20**.
The Tools node
While writing an explicit tool_executor_node is possible, it gets cumbersome as soon as we have more than one tool. For this purpose LangGraph offers us the ToolNode.
To use the prebuilt tool node, we first need to import it in our application:
# 5. Create the agent & tool nodedefagent_node(state:State):"""The LLM decides if it needs a tool or can answer directly."""print("--- AGENT: Reasoning ---")response=model.invoke(state["messages"])return{"messages":[response]}tool_node=ToolNode(tools)...# 7. Build the Graphworkflow=StateGraph(State)# Add Nodesworkflow.add_node("agent",agent_node)workflow.add_node("tools",tool_node)# Add the prebuilt node# Define Edgesworkflow.add_edge(START,"agent")# Use the prebuilt tools node in your edgesworkflow.add_conditional_edges("agent",should_continue,{"loop":"tools",# Matches the node name above"continue":END,})workflow.add_edge("tools","agent")
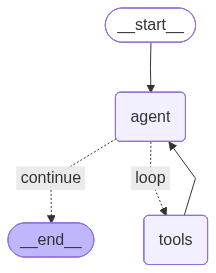
The graph is more or less the same, but our custom tool executor node is replaced by the prebuilt tool node:
The output no longer contains our explicit print statement, but the result stays the same:
With the @tool decorator we can turn our functions into tools. When we then use the prebuilt tool node, we can use our tools right away with our LLM. No matter what we need our tool to do, if we can write it in Python we can use it with LangGraph. Next week we see how we can ask for permissions before we call our tools.